FastAPIで完璧なブログを構築:コメントに返信する
Takashi Yamamoto
Infrastructure Engineer · Leapcell
前の記事「FastAPIブログにコメントシステムを追加する」では、FastAPIブログに基本的なコメントシステムを追加し、ユーザーが投稿について議論できるようになりました。
しかし、これらのコメントは一方通行でした。他の人はあなたの投稿にコメントできましたが、あなたは彼らのコメントに返信することができませんでした。
コメントセクションをよりインタラクティブにするために、この記事ではブログのコメント返信機能を実装します。ユーザーは既存のコメントに返信できるようになり、これらの返信は階層関係を明確に示すためにネストされた(またはインデントされた)形式で表示されます。
ステップ1:データモデルの更新
返信機能を実装するには、コメント間に親子の関係を確立する必要があります。返信は基本的にコメントですが、「親コメント」があります。これは、Commentモデルに自己参照関係を追加することで実現します。
1. Comment モデルの編集
models.pyファイルを開き、CommentモデルにparentId、parent、replies属性を追加します。
# models.py
import uuid
from datetime import datetime
from typing import Optional, List
from sqlmodel import Field, SQLModel, Relationship

class User(SQLModel, table=True):
    id: Optional[uuid.UUID] = Field(default_factory=uuid.uuid4, primary_key=True)
    username: str = Field(unique=True, index=True)
    password: str
    comments: List["Comment"] = Relationship(back_populates="user")

class Post(SQLModel, table=True):
    id: Optional[uuid.UUID] = Field(default_factory=uuid.uuid4, primary_key=True)
    title: str
    content: str
    createdAt: datetime = Field(default_factory=datetime.utcnow, nullable=False)
    comments: List["Comment"] = Relationship(back_populates="post")

class Comment(SQLModel, table=True):
    id: Optional[uuid.UUID] = Field(default_factory=uuid.uuid4, primary_key=True)
    content: str
    createdAt: datetime = Field(default_factory=datetime.utcnow, nullable=False)

    postId: uuid.UUID = Field(foreign_key="post.id")
    userId: uuid.UUID = Field(foreign_key="user.id")

    post: Post = Relationship(back_populates="comments")
    user: User = Relationship(back_populates="comments")

    # --- 新しいフィールド ---

    # 親コメントのIDを格納します。NULLの場合もあります。
    parentId: Optional[uuid.UUID] = Field(default=None, foreign_key="comment.id")

    # 親コメントとの関係を定義します。
    # sa_relationship_kwargs は、SQLAlchemy が自己参照関係を正しく処理するのに役立ちます
    parent: Optional["Comment"] = Relationship(
        back_populates="replies",
        sa_relationship_kwargs=dict(remote_side="Comment.id")
    )

    # 子コメント(返信)のリストとの関係を定義します。
    replies: List["Comment"] = Relationship(back_populates="parent")
parentId:commentテーブル自体にidを指す外部キーとして機能するオプションのフィールドです。トップレベルのコメントの場合、parentIdはNoneになります。parentおよびreplies: これらはRelationshipを使用してCommentモデル内の親子関係を定義します。これにより、comment.repliesを介してコメントへのすべての返信に簡単にアクセスできます。
main.pyでcreate_db_and_tables関数を自動的にモデルの変更を検出し、アプリケーション起動時にデータベーススキーマを更新するように構成したため、SQLを手動で実行する必要はありません。
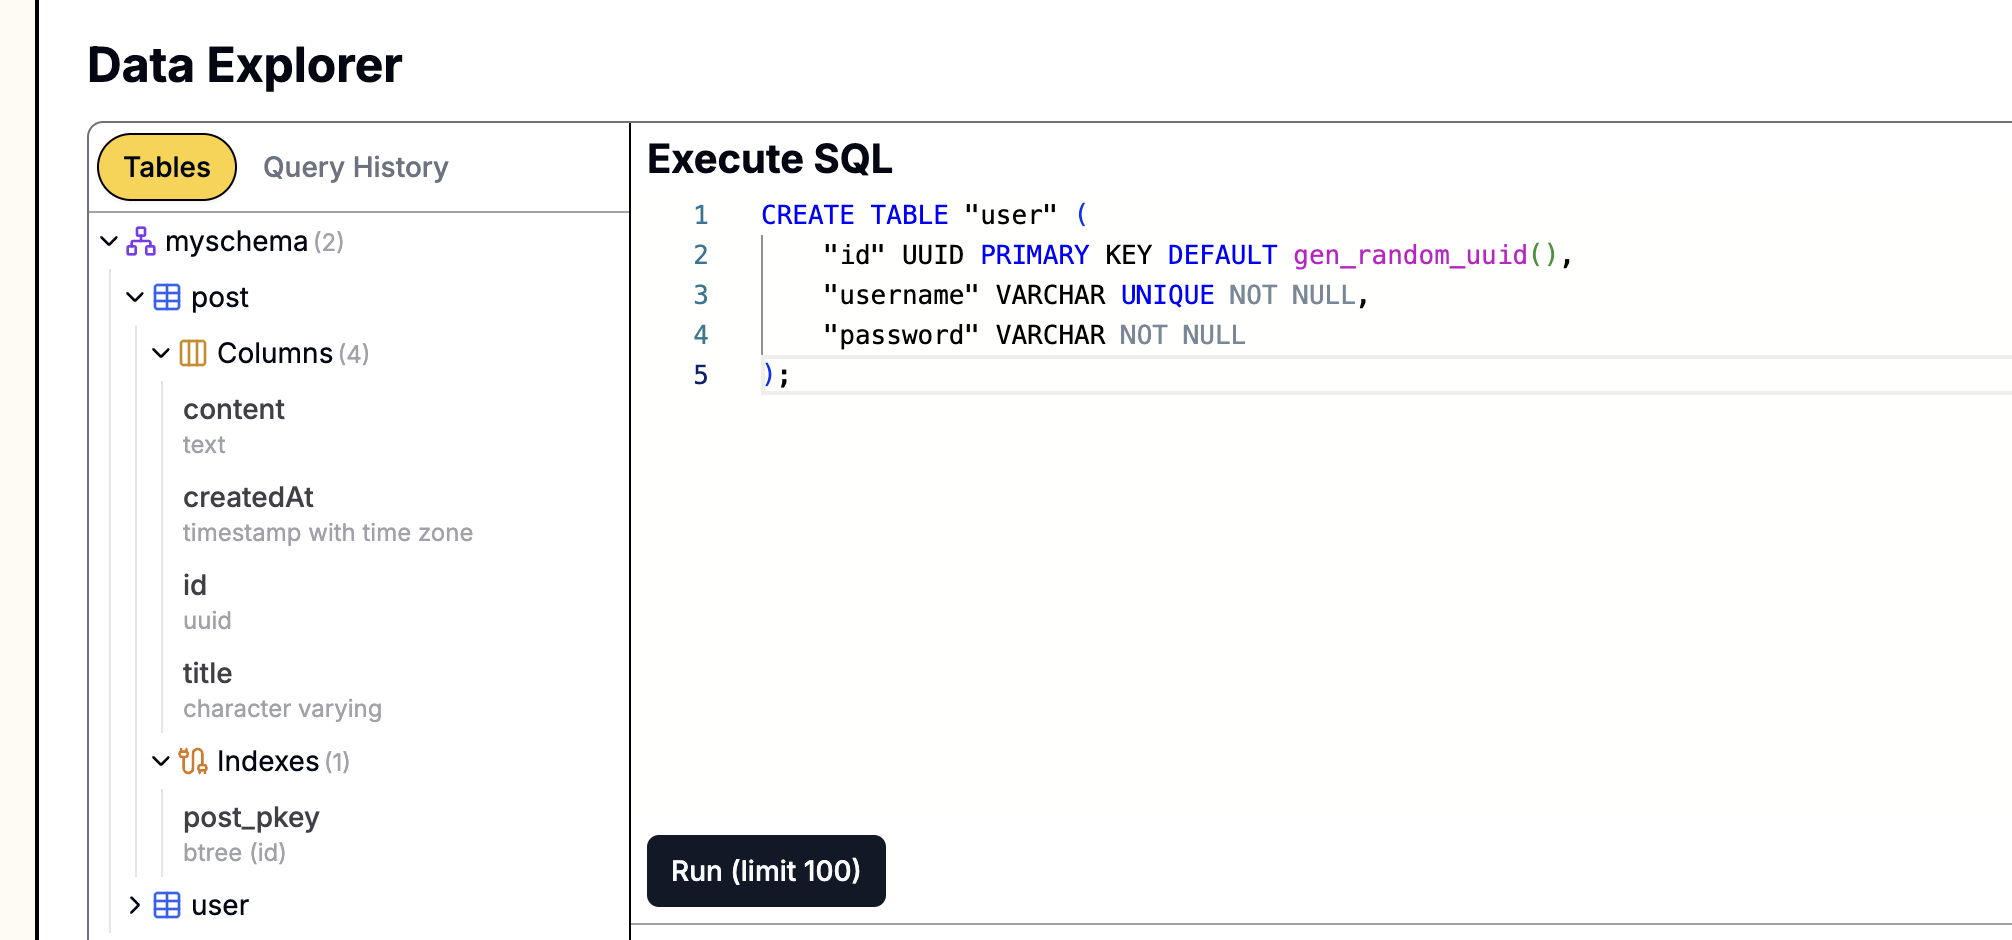
手動でSQLを実行する必要があり、データベースがLeapcell で作成された場合、

そのグラフィカルインターフェイスから簡単にSQLステートメントを実行できます。ウェブサイトのデータベース管理ページにアクセスし、SQLインターフェイスにステートメントを貼り付けて実行するだけです。
ステップ2:コメントサービスの調整
サービスレイヤーは、新しいコメントを作成する際に親コメントを関連付け、クエリを実行する際にコメントのフラットなリストをツリー構造に構造化するように調整する必要があります。
comments_service.pyを開き、以下の変更を行います。
# comments_service.py
import uuid
from typing import List, Optional
from sqlmodel import Session, select
from models import Comment

def structure_comments(comments: List[Comment]) -> List[Comment]:
    """フラットなコメントリストをツリー構造に変換します"""
    comment_map = {}
    # まず、repliesリストを初期化し、すべてのコメントをマップに入れて素早く検索できるようにします
    for comment in comments:
        comment.replies = []
        comment_map[comment.id] = comment

    root_comments = []
    # コメントを反復処理して親子関係を構築します
    for comment in comments:
        if comment.parentId:
            parent_comment = comment_map.get(comment.parentId)
            if parent_comment:
                parent_comment.replies.append(comment)
        else:
            root_comments.append(comment)

    return root_comments

def get_comments_by_post_id(post_id: uuid.UUID, session: Session) -> List[Comment]:
    """投稿のすべてのコメントを見つけ、ツリー構造に構造化します"""
    statement = select(Comment).where(Comment.postId == post_id).order_by(Comment.createdAt)
    comments = session.exec(statement).all()
    # 構造化されたコメントツリーを返します
    return structure_comments(comments)

def create_comment(
    content: str,
    user_id: uuid.UUID,
    post_id: uuid.UUID,
    session: Session,
    parent_id: Optional[uuid.UUID] = None  # optional parent_id パラメータを追加します
) -> Comment:
    """新しいコメントを作成し、オプションで親コメントにリンクします"""
    new_comment = Comment(
        content=content,
        userId=user_id,
        postId=post_id,
        parentId=parent_id  # parentId を設定します
    )
    session.add(new_comment)
    session.commit()
    session.refresh(new_comment)
    return new_comment
ロジックの説明:
get_comments_by_post_idは、投稿のすべてのコメント(トップレベルと返信の両方)を取得し、structure_commentsを呼び出して処理します。- 新しい
structure_commentsメソッドがこのロジックの中核となります。すべてのコメントを反復処理します。コメントにparentIdがある場合、その親のreplies配列に追加されます。ない場合はトップレベルのコメントです。この関数は最終的に、すべてトップレベルのコメントのリストを返します。各コメントは、返信のネストされたリストが含まれている可能性があります。 create_commentメソッドは、オプションのparent_idパラメータを追加します。このIDが提供されている場合、新しく作成されたコメントは対応する親コメントに関連付けられます。
ステップ3:ルートの更新
コントローラーは、リクエストボディからオプションのparentIdを受信し、それをサービスに渡す必要があります。この変更は非常に簡単です。
routers/comments.pyを開きます。
# routers/comments.py
import uuid
from typing import Optional
from fastapi import APIRouter, Depends, Form
from fastapi.responses import RedirectResponse
from sqlmodel import Session

from database import get_session
import comments_service
from auth_dependencies import login_required

router = APIRouter()

@router.post("/posts/{post_id}/comments")
def create_comment_for_post(
    post_id: uuid.UUID,
    content: str = Form(...),
    parentId: Optional[str] = Form(None), # <-- optional parentId を受信します
    user: dict = Depends(login_required),
    session: Session = Depends(get_session)
):
    user_id = uuid.UUID(user["id"])

    # parentId が存在する場合は UUID 型に変換します
    parent_uuid = uuid.UUID(parentId) if parentId else None

    comments_service.create_comment(
        content=content,
        user_id=user_id,
        post_id=post_id,
        session=session,
        parent_id=parent_uuid # parent_id をサービスに渡します
    )

    return RedirectResponse(url=f"/posts/{post_id}", status_code=302)
ステップ4:フロントエンドビューのアップグレード
これが最も変更が多い部分です。コメントとその返信を再帰的にレンダリングするためにpost.htmlテンプレートを更新する必要があり、動的に返信フォームを表示するためのJavaScriptも追加する必要があります。
1. コメントテンプレートの作成
コメントの再帰的レンダリングを達成するには、再利用可能な「マクロ」を作成するのが最善です。
templatesディレクトリに_comment.htmlという名前の新しいファイルを作成します。
{# templates/_comment.html #}
{% macro render_comment_tree(comments, user, post, depth) %}
  {% for comment in comments %}
    <div class="comment-item" style="margin-left: {{ depth * 20 }}px;">
      <p class="comment-content">{{ comment.content }}</p>
      <small>
        By <strong>{{ comment.user.username }}</strong> on {{ comment.createdAt.strftime('%Y-%m-%d') }}
      </small>
      {% if user %}
        <button class="reply-btn" data-comment-id="{{ comment.id }}">Reply</button>
      {% endif %}
    </div>

    {# 返信をレンダリングするために再帰的に呼び出します #}
    {% if comment.replies %}
      {{ render_comment_tree(comment.replies, user, post, depth + 1) }}
    {% endif %}
  {% endfor %}
{% endmacro %}
このテンプレートはrender_comment_treeという名前のマクロを定義します。渡されたcomments配列を反復処理し、各コメントのreplies配列に対して再帰的に自分自身を呼び出し、depthをインクリメントして視覚的なインデントを作成します。
2. post.htmlの更新
次に、templates/post.htmlを編集してこの新しいマクロを使用し、対応するJavaScriptロジックを備えたユニバーサル返信フォームを追加します。
{# templates/post.html #} {# ... post content section ... #} <div class="post-content">{{ post.content | replace('\n', '<br>') | safe }}</div> </article> {# マクロをインポートします #} {% from '_comment.html' import render_comment_tree %} <section class="comments-section"> <h3>Comments</h3> <div class="comment-list"> {% if comments %} {# マクロを呼び出してコメントツリーをレンダリングします #} {{ render_comment_tree(comments, user, post, 0) }} {% else %} <p>まだコメントはありません。最初にコメントしましょう!</p> {% endif %} </div> {% if user %} <form id="comment-form" action="/posts/{{ post.id }}/comments" method="POST" class="comment-form"> <h4>Leave a Comment</h4> <div class="form-group"> <textarea name="content" rows="4" placeholder="ここにコメントを書いてください..." required></textarea> {# 親Idの隠し入力フィールドを追加します #} <input type="hidden" name="parentId" id="parentIdInput" value="" /> </div> <button type="submit">Submit Comment</button> <button type="button" id="cancel-reply-btn" style="display: none;">Cancel Reply</button> </form> {% else %} <p><a href="/auth/login">ログイン</a>してコメントを残してください。</p> {% endif %} </section> <script> document.addEventListener('DOMContentLoaded', () => { const commentForm = document.getElementById('comment-form'); const parentIdInput = document.getElementById('parentIdInput'); const formTitle = commentForm.querySelector('h4'); const cancelReplyBtn = document.getElementById('cancel-reply-btn'); const commentList = document.querySelector('.comment-list'); commentList.addEventListener('click', (e) => { if (e.target.classList.contains('reply-btn')) { const commentId = e.target.getAttribute('data-comment-id'); const commentItem = e.target.closest('.comment-item'); // 返信するコメントの直下にフォームを移動させます commentItem.after(commentForm); // parentId を設定し、フォームのタイトルを更新します parentIdInput.value = commentId; formTitle.innerText = 'Replying to ' + commentItem.querySelector('strong').innerText; cancelReplyBtn.style.display = 'inline-block'; } }); cancelReplyBtn.addEventListener('click', () => { // フォームの状態をリセットします parentIdInput.value = ''; formTitle.innerText = 'Leave a Comment'; cancelReplyBtn.style.display = 'none'; // フォームをコメントセクションの最下部に戻します document.querySelector('.comments-section').appendChild(commentForm); }); }); </script> <a href="/" class="back-link">← Homeに戻る</a> {% include "_footer.html" %}
JavaScriptロジックの説明:
- ページには1つのコメントフォームしかありません。
- ユーザーがコメントの「返信」ボタンをクリックすると、JavaScriptはそのコメントのIDを取得し、フォームの隠し
parentId入力フィールドの値として設定します。 - 同時に、フォーム全体を返信対象のコメントの直後に移動させ、フォームのタイトルを更新して、ユーザーに明確なコンテキストを提供します。
- 返信時には「返信をキャンセル」ボタンが表示されます。これをクリックすると、フォームがリセットされ、コメントセクションの最下部に戻されます。
実行とテスト
アプリケーションを再起動します。
uvicorn main:app --reload
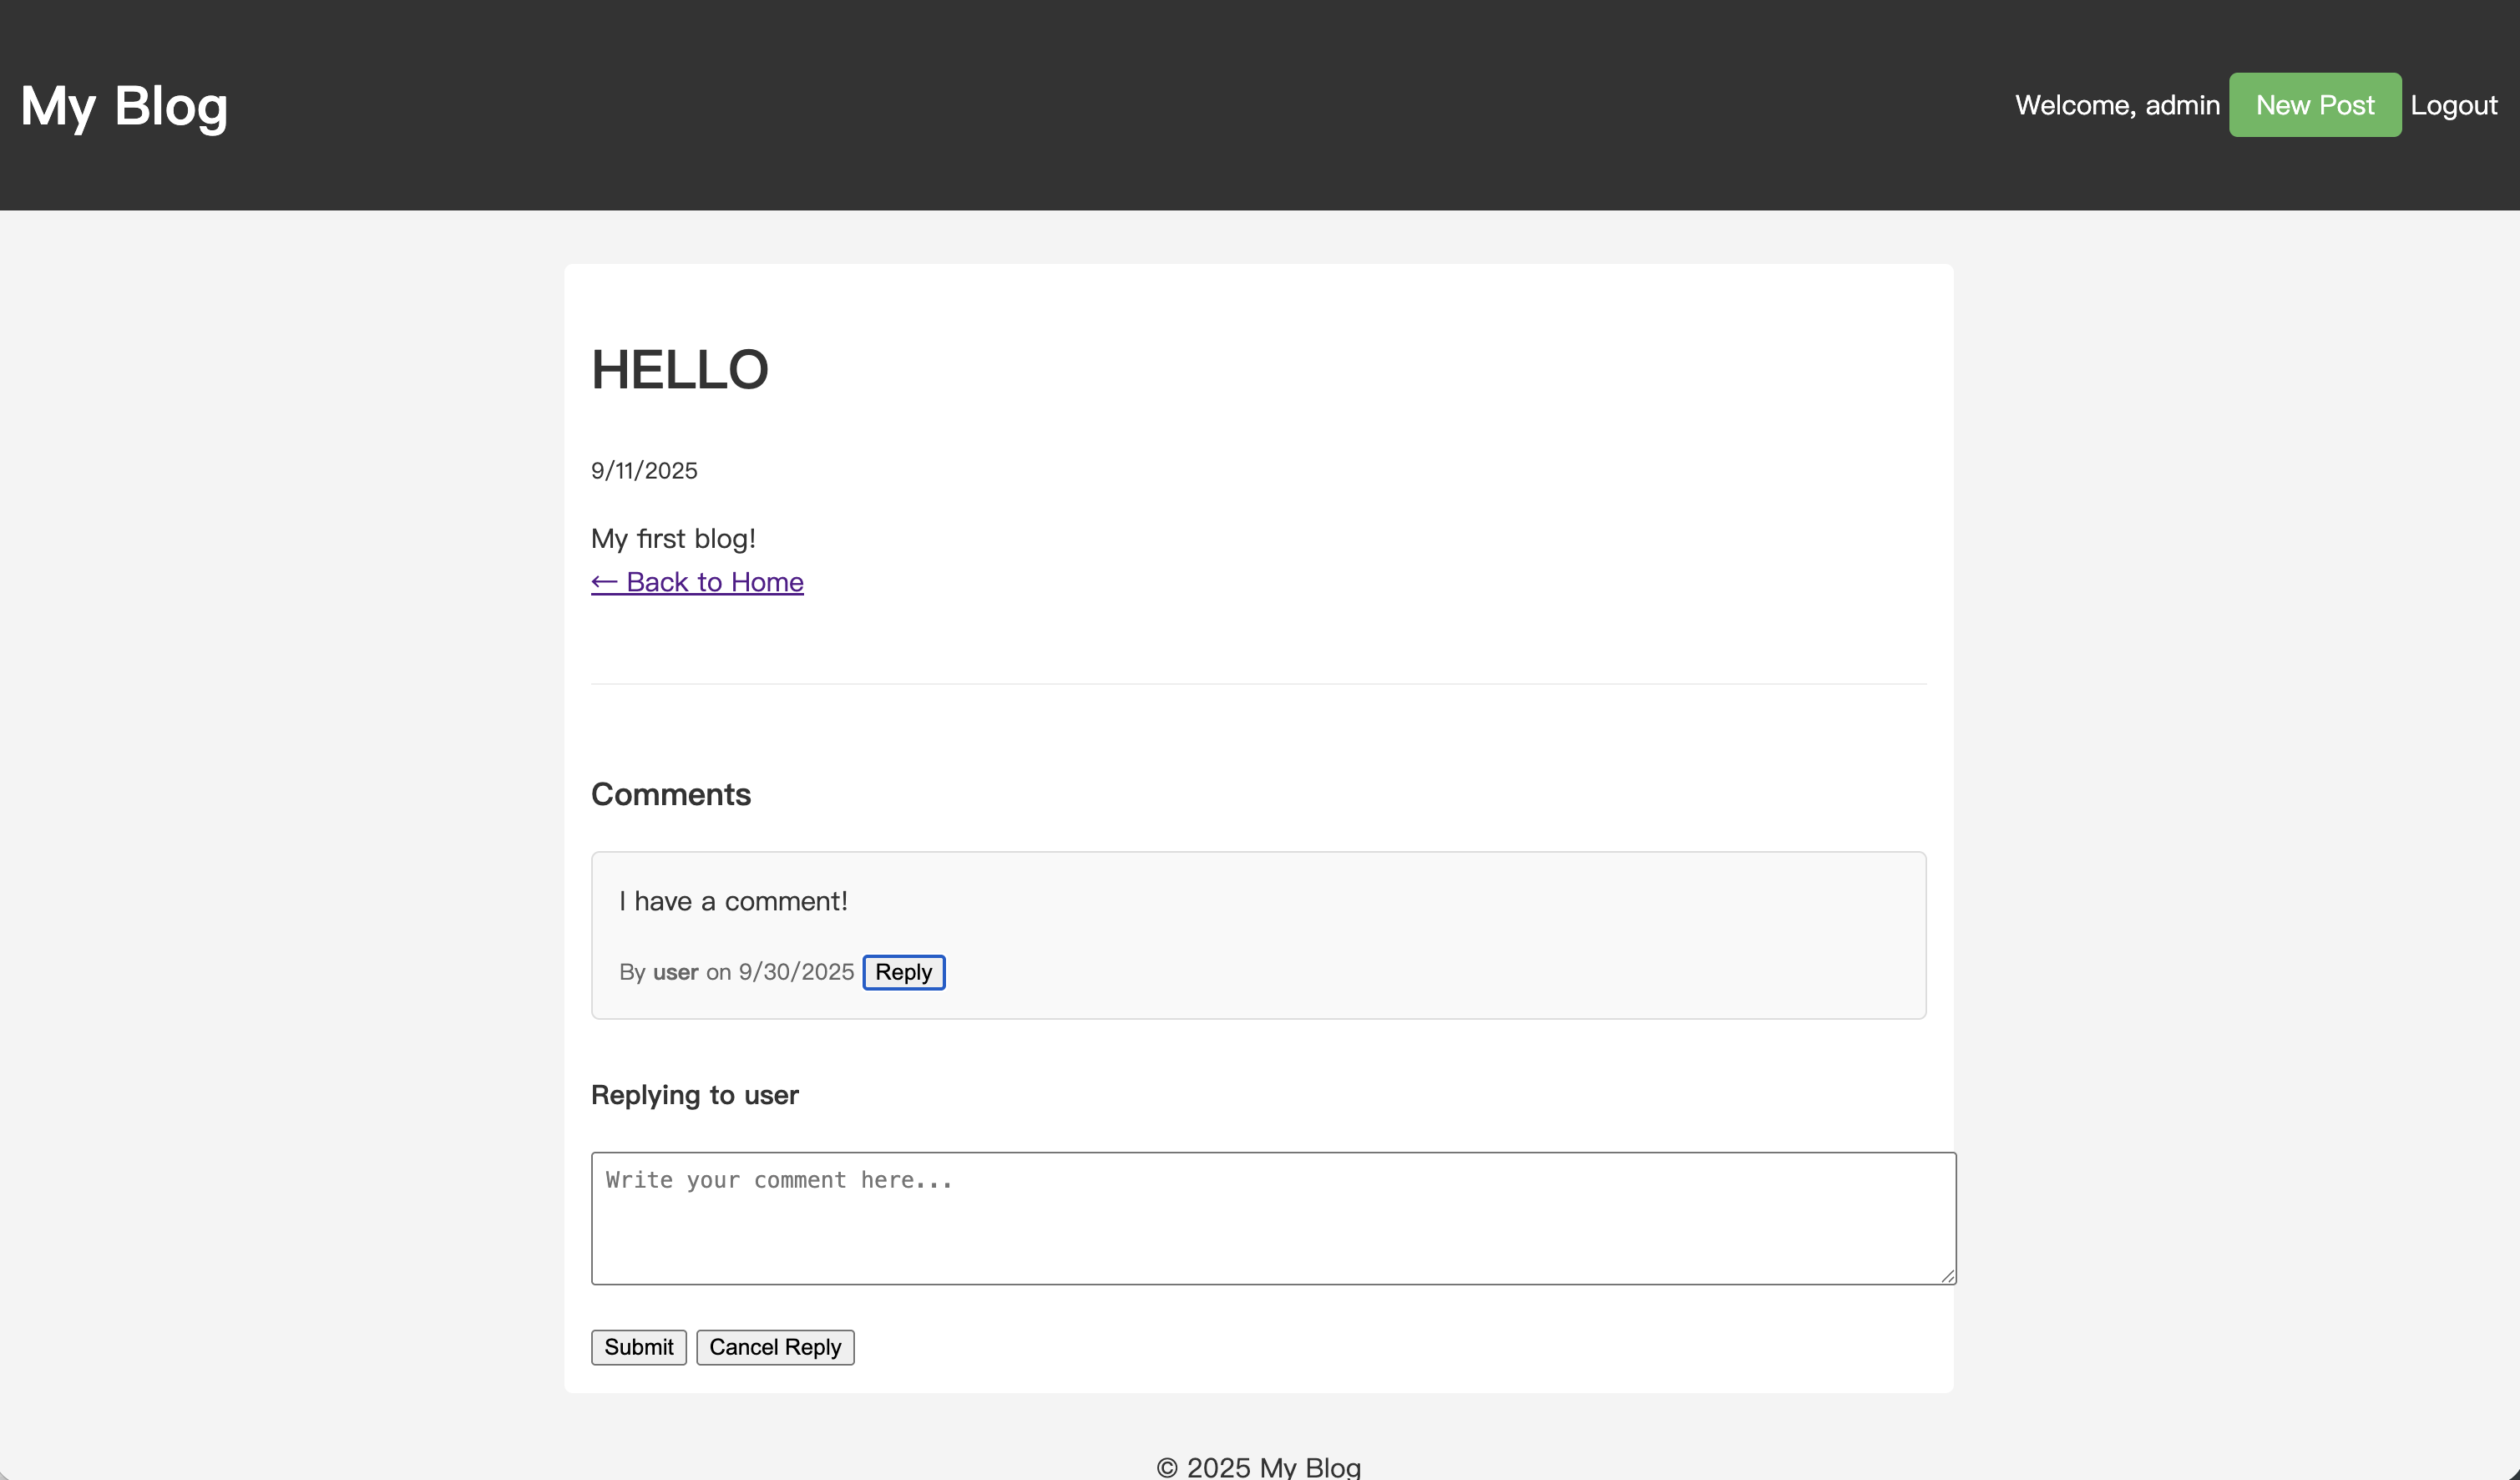
ブラウザを開き、いずれかの投稿の詳細ページに移動します。コメントを見つけて、その横にある「返信」ボタンをクリックします。
コメントの直下にコメントフォームが表示されるのがわかります。
コンテンツを入力して送信します。ページがリフレッシュされると、返信が親コメントの下にインデントされて表示されます。
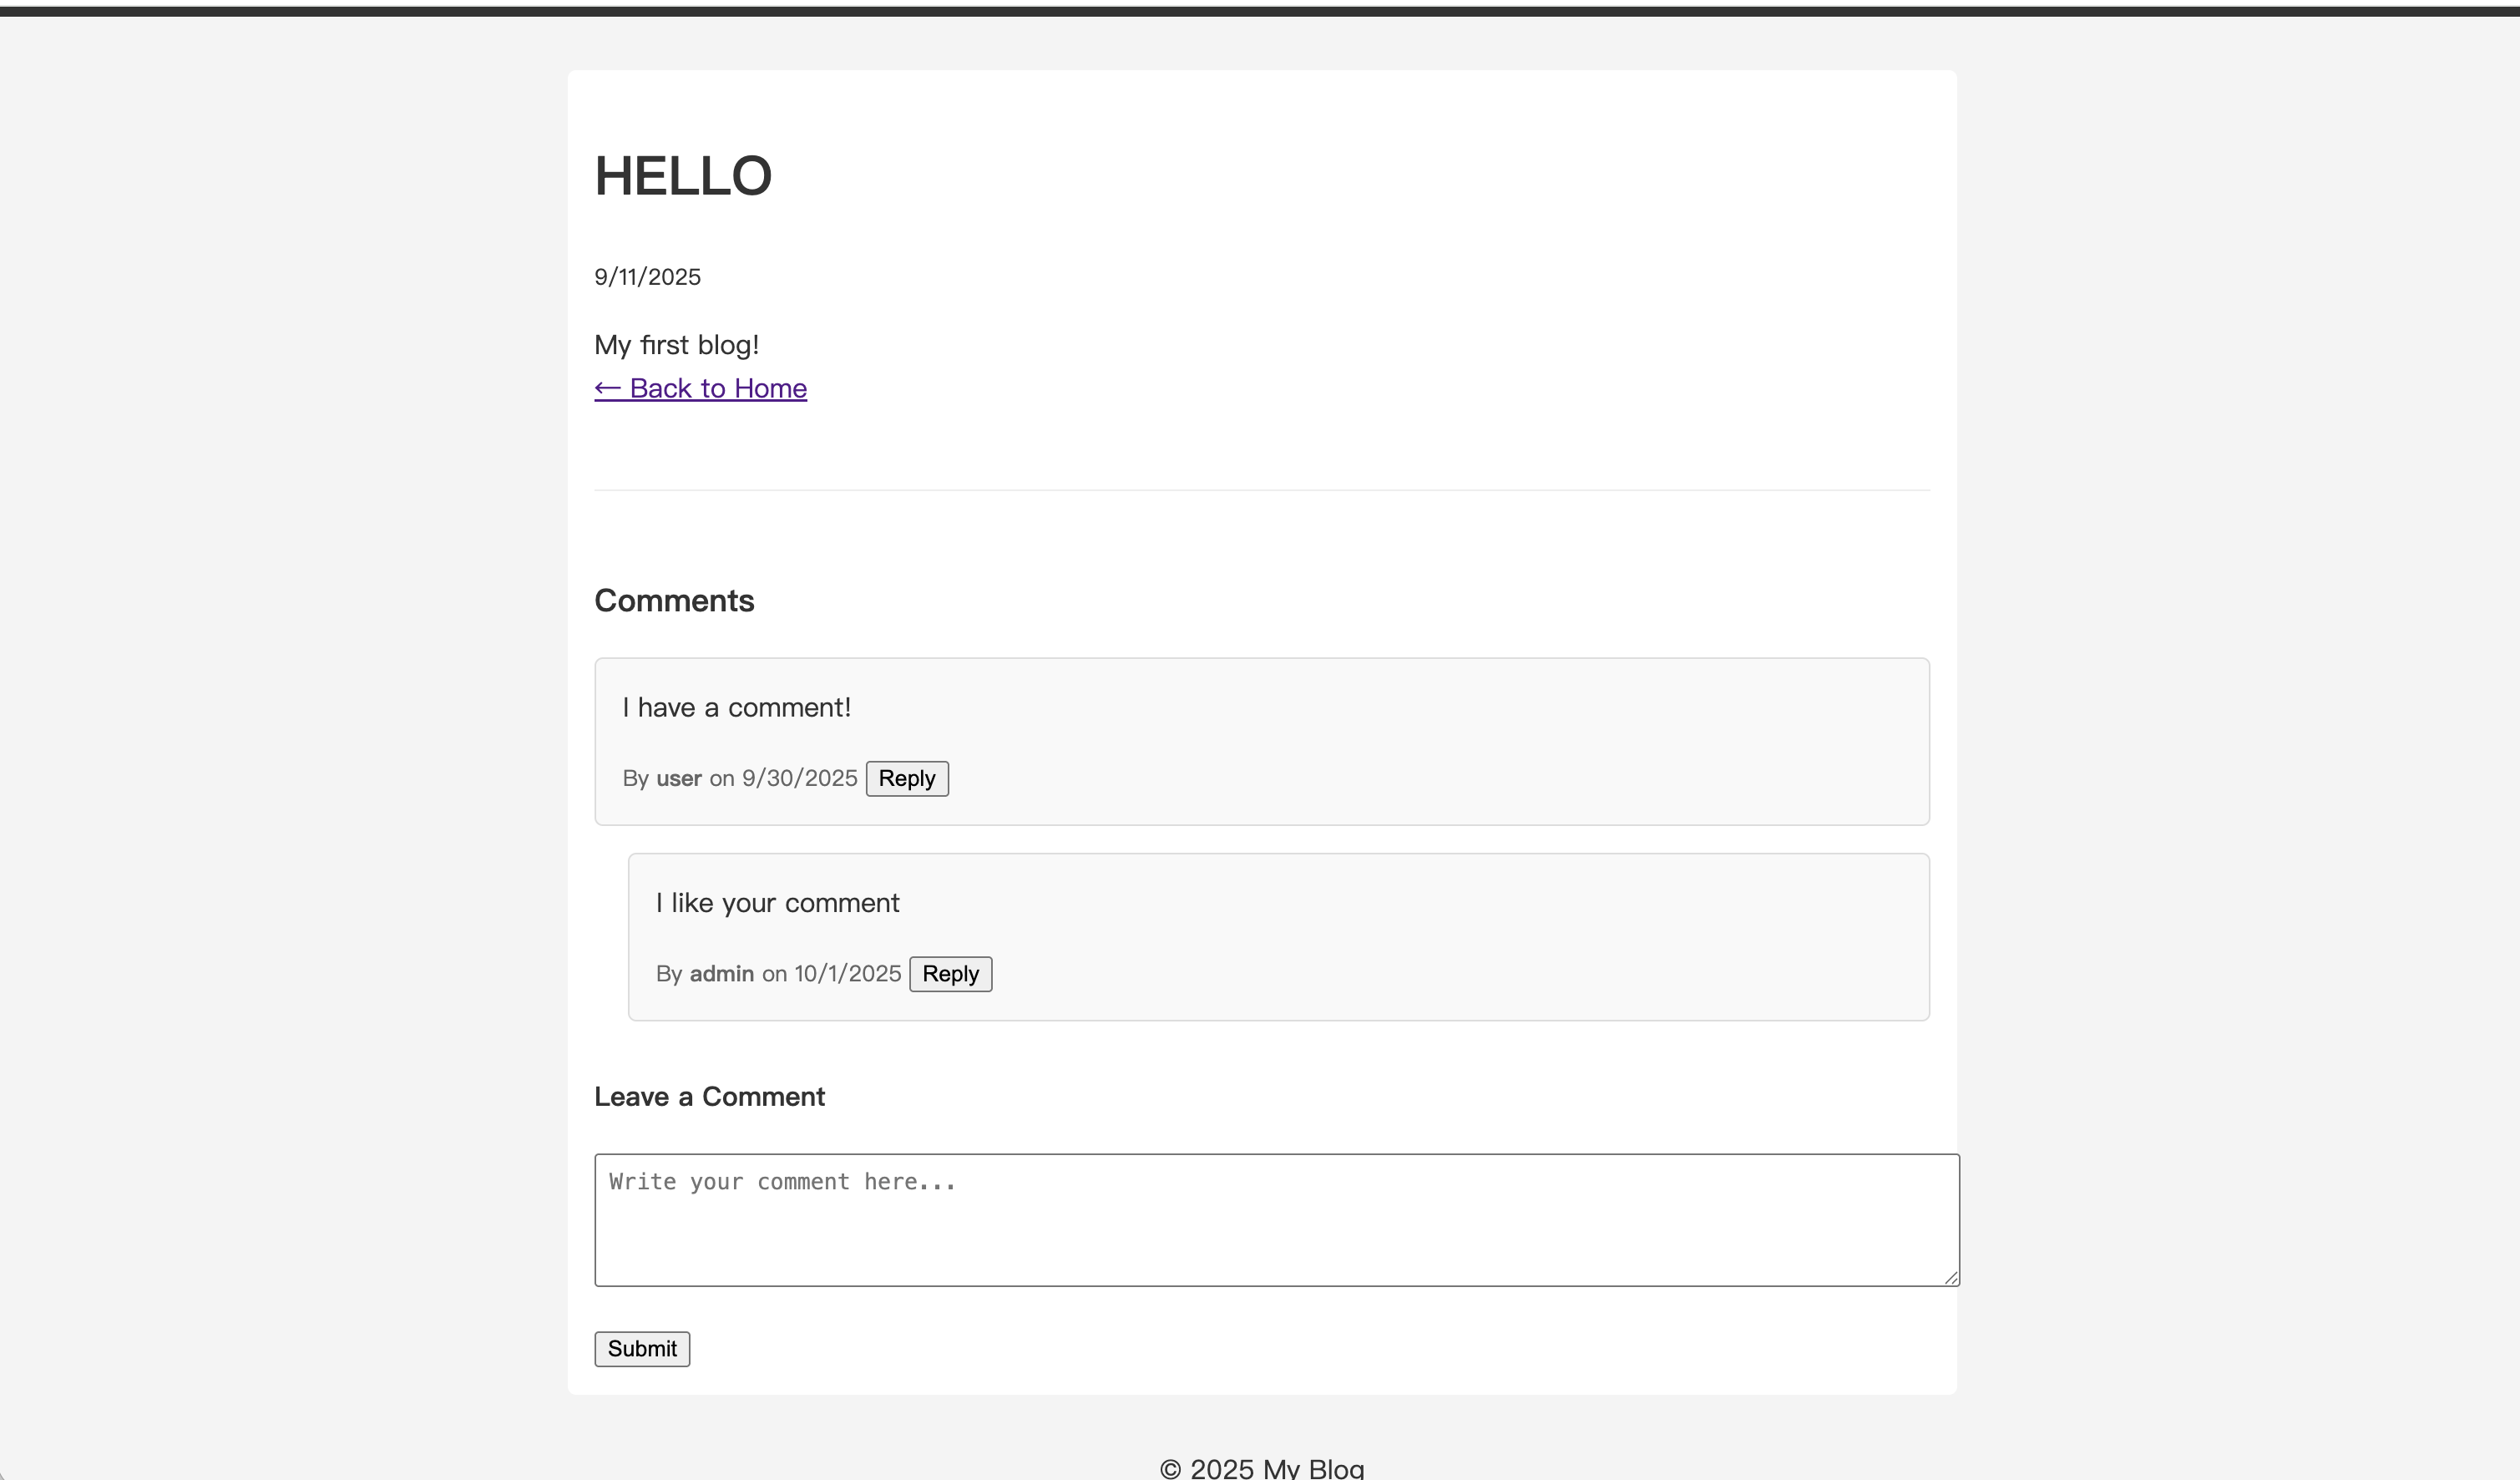
返信に返信を続けることができ、複数の会話レベルを作成できます。
これで、完全なコメント返信システムが完成しました。