FastAPIで独自のフォーラムを構築する:ステップ4 - ユーザーシステム
Min-jun Kim
Dev Intern · Leapcell
前の記事では、Jinja2テンプレートエンジンを使用して、バックエンドのPythonロジックからフロントエンドのHTMLコードを分離し、プロジェクト構造をより明確にしました。
現在のフォーラムでは誰でも匿名で投稿できるため、コミュニティの運営方法としては適切ではありません。フォーラムはユーザーを中心に構築されるべきです。各ユーザーには独自のID、独自の投稿、返信があります。
そこで、この記事では、ユーザー登録、ログイン、ログアウト機能を含む完全なユーザーシステムをフォーラムに追加します。
ステップ1:依存関係のインストール
パスワード暗号化を処理するライブラリが必要です。ユーザーのパスワードは、極めて危険であるため、プレーンテキストで保存することはできません。ここではpasslibとpbkdf2_sha256アルゴリズムを使用します。
次のコマンドを実行します。
pip install "passlib[pbkdf2_sha256]"
ステップ2:データベースモデルの更新
ユーザー情報を保存するための新しいテーブルが必要であり、各投稿の作成者を記録するためにpostsテーブルをusersテーブルに関連付ける必要があります。
models.pyファイルを開き、以下の変更を加えます。
models.py(更新版)
from sqlalchemy import Column, Integer, String, ForeignKey
from sqlalchemy.orm import relationship
from database import Base

class User(Base):
    __tablename__ = "users"

    id = Column(Integer, primary_key=True, index=True)
    username = Column(String, unique=True, index=True)
    hashed_password = Column(String)

    posts = relationship("Post", back_populates="owner")

class Post(Base):
    __tablename__ = "posts"

    id = Column(Integer, primary_key=True, index=True)
    title = Column(String, index=True)
    content = Column(String)
    owner_id = Column(Integer, ForeignKey("users.id"))

    owner = relationship("User", back_populates="posts")
ここでは2つのことを行いました。
Userモデルの作成:id、一意のusername、hashed_passwordフィールドを含むusersテーブルを定義します。
PostとUserの関連付け:Postモデルに、usersテーブルのidを指す外部キーとしてowner_idフィールドを追加しました。- SQLAlchemyの
relationshipを使用して、PostとUserの間に双方向の関連付けを確立しました。これで、post.ownerを通じて投稿の作成者にアクセスでき、user.postsを通じてユーザーのすべての投稿にアクセスすることもできます。
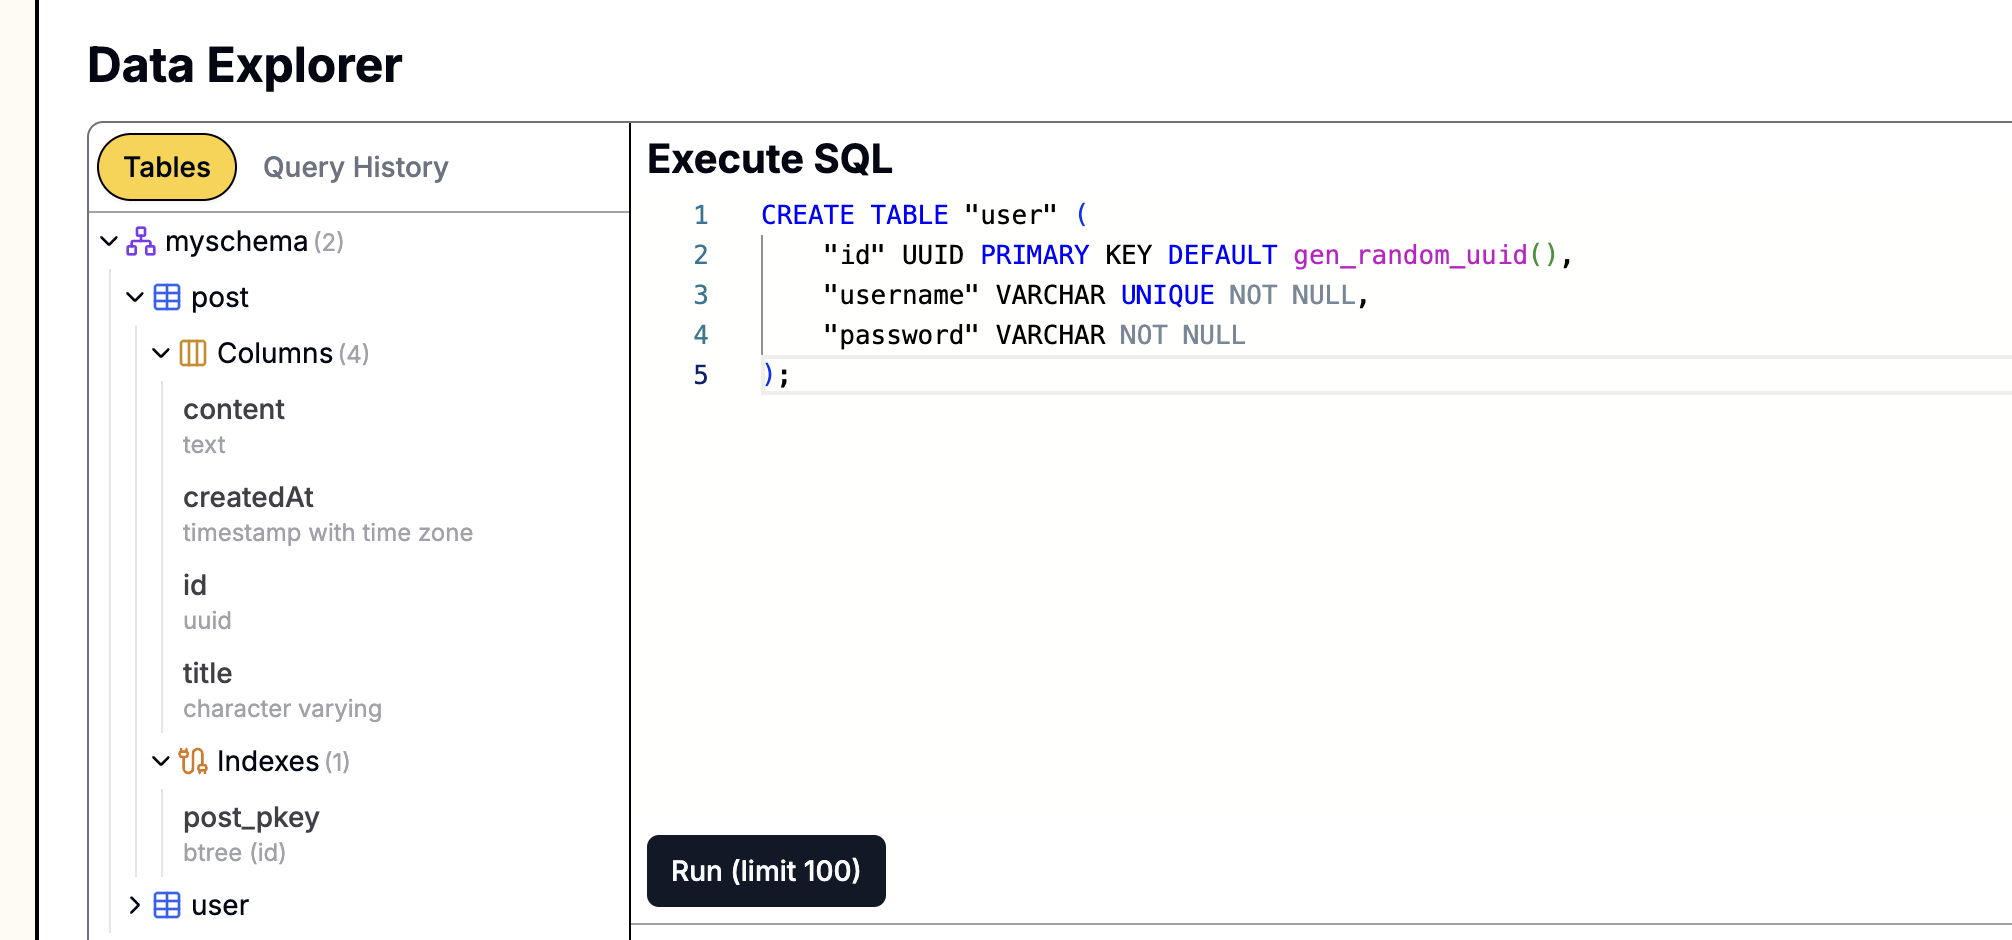
これらのモデルを適用する前に、データベースを手動で更新する必要があります。usersテーブルを作成し、postsテーブルを変更する必要があります。
対応するSQLステートメントは次のとおりです。
-- usersテーブルの作成
CREATE TABLE users (
    id SERIAL PRIMARY KEY,
    username VARCHAR UNIQUE,
    hashed_password VARCHAR
);

-- postsテーブルの変更、owner_idカラムと外部キー制約の追加
ALTER TABLE posts ADD COLUMN owner_id INTEGER;
ALTER TABLE posts ADD CONSTRAINT fk_owner_id FOREIGN KEY (owner_id) REFERENCES users (id);
Leapcellを使用してデータベースを作成した場合、

そのWebベースの操作パネルでこれらのSQLステートメントを直接実行できます。
ステップ3:パスワードの処理
新しいファイルauth.pyを作成し、パスワードハッシュ化および検証用の関数を記述して、パスワードを安全に処理します。
auth.py
from passlib.context import CryptContext

# 1. CryptContextインスタンスを作成し、暗号化アルゴリズムを指定
pwd_context = CryptContext(schemes=["bcrypt"], deprecated="auto")

# 2. パスワード検証用関数
def verify_password(plain_password, hashed_password):
    return pwd_context.verify(plain_password, hashed_password)

# 3. パスワードハッシュ生成用関数
def get_password_hash(password):
    return pwd_context.hash(password)
verify_password:ユーザーが入力したプレーンテキストパスワードとデータベースに保存されているハッシュ化されたパスワードを比較して、一致するかどうかを確認します。get_password_hash:プレーンテキストパスワードをハッシュ値に変換して、データベースに保存できるようにします。
ステップ4:ユーザー登録およびログインページの作成
posts.htmlと同様に、templatesフォルダ内にregister.htmlとlogin.htmlという2つの新しいHTMLファイルを作成します。
templates/register.html
<!DOCTYPE html>
<html>
  <head>
    <title>Register - My FastAPI Forum</title>
    <style>
      body {
        font-family: sans-serif;
        margin: 2em;
      }
      form {
        width: 300px;
        margin: 0 auto;
      }
      input {
        width: 100%;
        padding: 8px;
        margin-bottom: 10px;
        box-sizing: border-box;
      }
      button {
        padding: 10px 15px;
        background-color: #007bff;
        color: white;
        border: none;
        cursor: pointer;
        width: 100%;
      }
      .error {
        color: red;
      }
    </style>
  </head>
  <body>
    <h1>Register New User</h1>
    {% if error %}
    <p class="error">{{ error }}</p>
    {% endif %}
    <form method="post">
      <input type="text" name="username" placeholder="Username" required /><br />
      <input type="password" name="password" placeholder="Password" required /><br />
      <button type="submit">Register</button>
    </form>
  </body>
</html>
templates/login.html
<!DOCTYPE html>
<html>
  <head>
    <title>Login - My FastAPI Forum</title>
    <style>
      body {
        font-family: sans-serif;
        margin: 2em;
      }
      form {
        width: 300px;
        margin: 0 auto;
      }
      input {
        width: 100%;
        padding: 8px;
        margin-bottom: 10px;
        box-sizing: border-box;
      }
      button {
        padding: 10px 15px;
        background-color: #007bff;
        color: white;
        border: none;
        cursor: pointer;
        width: 100%;
      }
      .error {
        color: red;
      }
    </style>
  </head>
  <body>
    <h1>User Login</h1>
    {% if error %}
    <p class="error">{{ error }}</p>
    {% endif %}
    <form method="post">
      <input type="text" name="username" placeholder="Username" required /><br />
      <input type="password" name="password" placeholder="Password" required /><br />
      <button type="submit">Login</button>
    </form>
  </body>
</html>
ステップ5:認証関連のAPIルートの実装
main.pyをリファクタリングして、登録、ログイン、ログアウト、および現在のユーザー状態管理機能を追加します。これは比較的大きな更新です。
main.py(最終完全版)
from fastapi import FastAPI, Form, Depends, Request, Response, HTTPException, status
from fastapi.responses import HTMLResponse, RedirectResponse
from fastapi.templating import Jinja2Templates
from sqlalchemy.ext.asyncio import AsyncSession
from sqlalchemy import select, desc
from sqlalchemy.orm import selectinload
from typing import Optional

import models
from database import get_db
from auth import get_password_hash, verify_password

app = FastAPI()

templates = Jinja2Templates(directory="templates")

# --- ユーザー状態依存関係 ---
async def get_current_user(request: Request, db: AsyncSession = Depends(get_db)) -> Optional[models.User]:
    username = request.cookies.get("forum_user")
    if not username:
        return None
    result = await db.execute(select(models.User).where(models.User.username == username))
    return result.scalar_one_or_none()

# --- ルート ---

@app.get("/", response_class=RedirectResponse)
def read_root():
    return RedirectResponse(url="/posts", status_code=status.HTTP_302_FOUND)

@app.get("/posts", response_class=HTMLResponse)
async def view_posts(request: Request, db: AsyncSession = Depends(get_db), current_user: Optional[models.User] = Depends(get_current_user)):
    # N+1クエリ問題を回避するために、selectinloadを使用してownerリレーションシップをプリロードします
    result = await db.execute(
        select(models.Post).options(selectinload(models.Post.owner)).order_by(desc(models.Post.id))
    )
    posts = result.scalars().all()
    return templates.TemplateResponse("posts.html", {"request": request, "posts": posts, "current_user": current_user})

@app.post("/api/posts")
async def create_post(
    title: str = Form(...),
    content: str = Form(...),
    db: AsyncSession = Depends(get_db),
    current_user: Optional[models.User] = Depends(get_current_user)
):
    if not current_user:
        return RedirectResponse(url="/login", status_code=status.HTTP_302_FOUND)

    new_post = models.Post(title=title, content=content, owner_id=current_user.id)
    db.add(new_post)
    await db.commit()
    await db.refresh(new_post)
    return RedirectResponse(url="/posts", status_code=status.HTTP_303_SEE_OTHER)

@app.get("/register", response_class=HTMLResponse)
async def get_registration_form(request: Request):
    return templates.TemplateResponse("register.html", {"request": request})

@app.post("/register")
async def register_user(
    request: Request,
    username: str = Form(...),
    password: str = Form(...),
    db: AsyncSession = Depends(get_db)
):
    result = await db.execute(select(models.User).where(models.User.username == username))
    if result.scalar_one_or_none():
        return templates.TemplateResponse("register.html", {"request": request, "error": "Username already exists"})

    hashed_password = get_password_hash(password)
    new_user = models.User(username=username, hashed_password=hashed_password)
    db.add(new_user)
    await db.commit()

    return RedirectResponse(url="/login", status_code=status.HTTP_303_SEE_OTHER)

@app.get(/login, response_class=HTMLResponse)
async def get_login_form(request: Request):
    return templates.TemplateResponse("login.html", {"request": request})

@app.post("/login")
async def login_user(
    response: Response,
    request: Request,
    username: str = Form(...),
    password: str = Form(...),
    db: AsyncSession = Depends(get_db)
):
    result = await db.execute(select(models.User).where(models.User.username == username))
    user = result.scalar_one_or_none()

    if not user or not verify_password(password, user.hashed_password):
        return templates.TemplateResponse("login.html", {"request": request, "error": "Incorrect username or password"})

    # シンプルなセッションを実装するためにCookieを使用します
    response = RedirectResponse(url="/posts", status_code=status.HTTP_303_SEE_OTHER)
    response.set_cookie(key="forum_user", value=user.username, httponly=True)
    return response

@app.get("/logout")
async def logout_user(response: Response):
    response = RedirectResponse(url="/posts", status_code=status.HTTP_303_SEE_OTHER)
    response.delete_cookie(key="forum_user")
    return response
このファイルは主にこれらの変更を行いました。
get_current_user関数の追加:この関数は、リクエスト内のforum_userCookieを読み取って現在のユーザーを識別します。後続のルートでは、Depends(get_current_user)を通じてログイン中のユーザー情報を直接取得できます。- ユーザー登録およびログイン関連ルートの追加
- 登録(
/register):GETリクエストは登録フォームを表示し、POSTリクエストはフォーム送信を処理します。ユーザー名が既に存在するかどうかを確認し、パスワードをハッシュ化してデータベースに保存します。 - ログイン(
/login):GETリクエストはログインフォームを表示します。POSTリクエストは、ユーザー名とパスワードを検証します。成功した場合、レスポンスにforum_userという名前のCookieを設定し、ユーザー名を値として設定します。これはシンプルなセッション実装です。 - ログアウト(
/logout):forum_userCookieをクリアし、ホームページにリダイレクトします。
- 登録(
- ルート保護:
create_postルートは、get_current_userに依存するようになりました。ユーザーがログインしていない場合、ログインページにリダイレクトされます。投稿時、投稿のowner_idは自動的に現在ログインしているユーザーのIDに設定されます。 - ビューの更新:
/postsなどのルートは、現在のユーザー情報を取得し、テンプレートに渡して、ページにログイン状態を表示できるようにします。
ステップ6:ホームページテンプレートを更新してユーザー状態を表示する
最後に、templates/posts.htmlを修正して、ユーザーのログイン状態に基づいて異なるコンテンツを表示できるようにします。
templates/posts.html(更新版)
<!DOCTYPE html>
<html>
  <head>
    <title>My FastAPI Forum</title>
    <style>
      body {
        font-family: sans-serif;
        margin: 2em;
      }
      input,
      textarea {
        width: 100%;
        padding: 8px;
        margin-bottom: 10px;
        box-sizing: border-box;
      }
      button {
        padding: 10px 15px;
        background-color: #007bff;
        color: white;
        border: none;
        cursor: pointer;
      }
      header {
        display: flex;
        justify-content: space-between;
        align-items: center;
      }
    </style>
  </head>
  <body>
    <header>
      <h1>Welcome to My Forum</h1>

      <div class="auth-links">
        {% if current_user %}
        <span>Welcome, {{ current_user.username }}!</span>
        <a href="/logout">Logout</a>
        {% else %}
        <a href="/login">Login</a> |
        <a href="/register">Register</a>
        {% endif %}
      </div>
    </header>

    {% if current_user %}
    <h2>Create a New Post</h2>
    <form action="/api/posts" method="post">
      <input type="text" name="title" placeholder="Post Title" required /><br />
      <textarea name="content" rows="4" placeholder="Post Content" required></textarea><br />
      <button type="submit">Post</button>
    </form>
    {% else %}
    <p><a href="/login">Login</a> to create a new post.</p>
    {% endif %}

    <hr />
    <h2>Post List</h2>

    {% for post in posts %}
    <div style="border: 1px solid #ccc; padding: 10px; margin-bottom: 10px;">
      <h3>{{ post.title }}</h3>
      <p>{{ post.content }}</p>
      <small>Author: {{ post.owner.username if post.owner else 'Unknown' }}</small>
    </div>
    {% endfor %}
  </body>
</html>
テンプレートは主にこれらの変更を行いました。
- 上部のナビゲーションは、ログイン状態を判断するために
{% if current_user %}を使用します。ユーザーがログインしている場合、ウェルカムメッセージと「Logout」リンクが表示されます。それ以外の場合は、「Login」と「Register」リンクが表示されます。 - 新しい投稿用のフォームは、ログイン中のユーザーのみが表示できるように制限されています。
- 各投稿の下部に、
{{ post.owner.username }}を通じて作成者のユーザー名が表示されます。
実行と検証
結果を確認する時です!uvicornサーバーを再起動します。
uvicorn main:app --reload
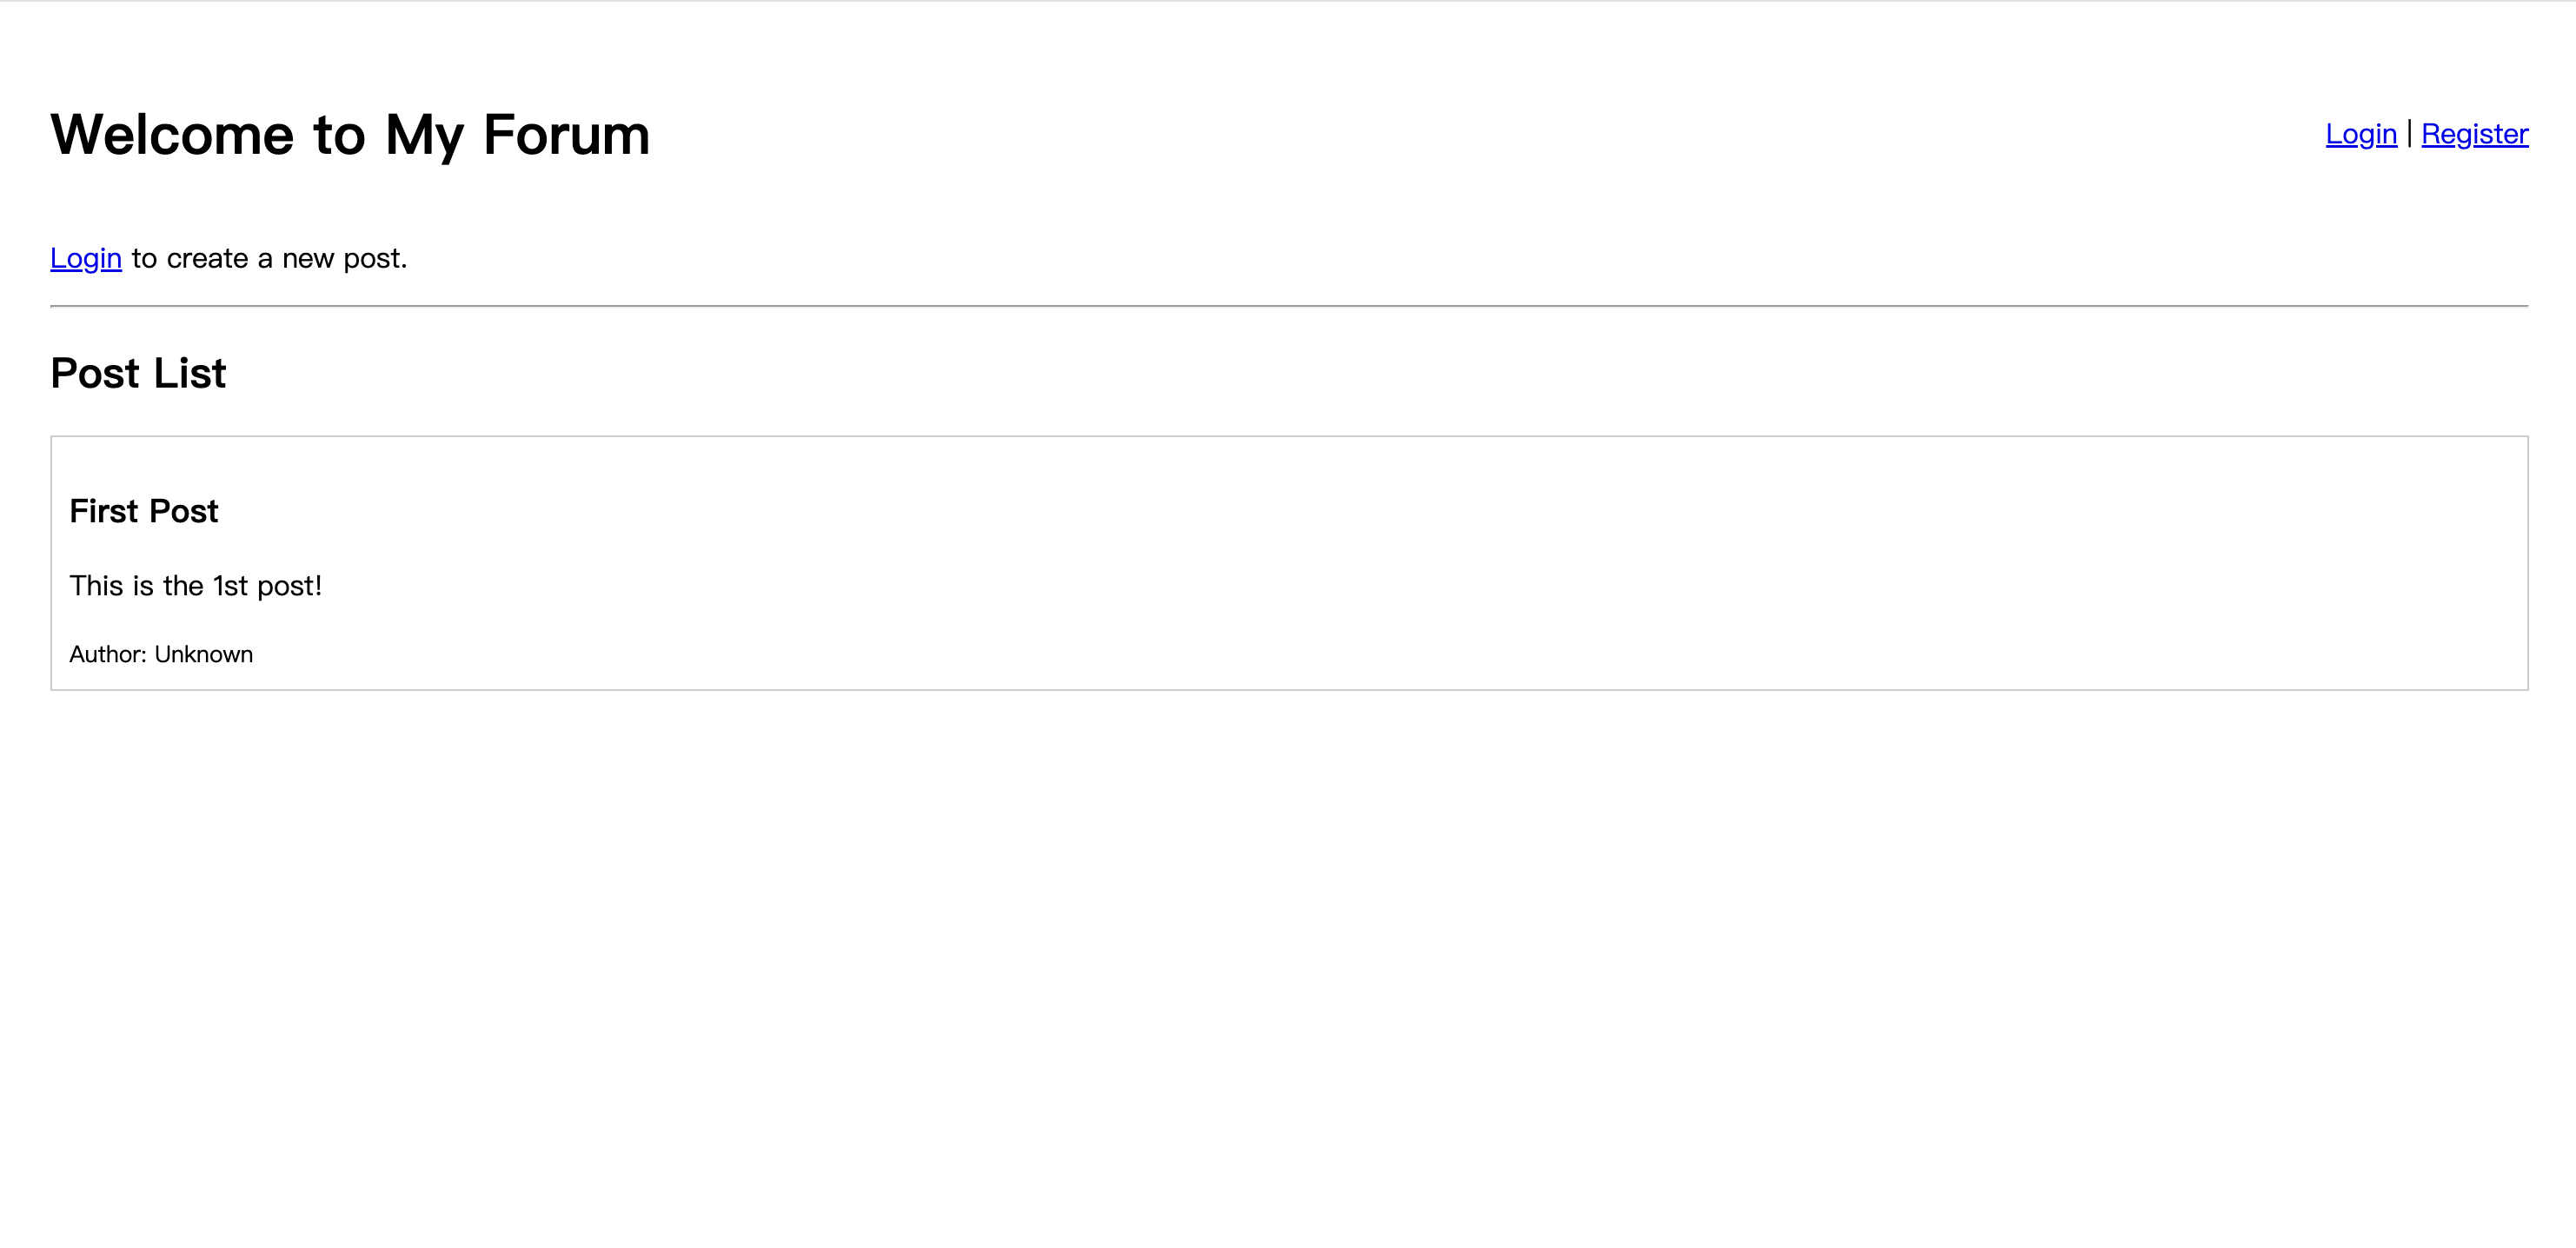
http://127.0.0.1:8000にアクセスします。ホームページの右上隅に「Login」と「Register」リンクが表示され、ページに投稿を作成するエントリはありません。
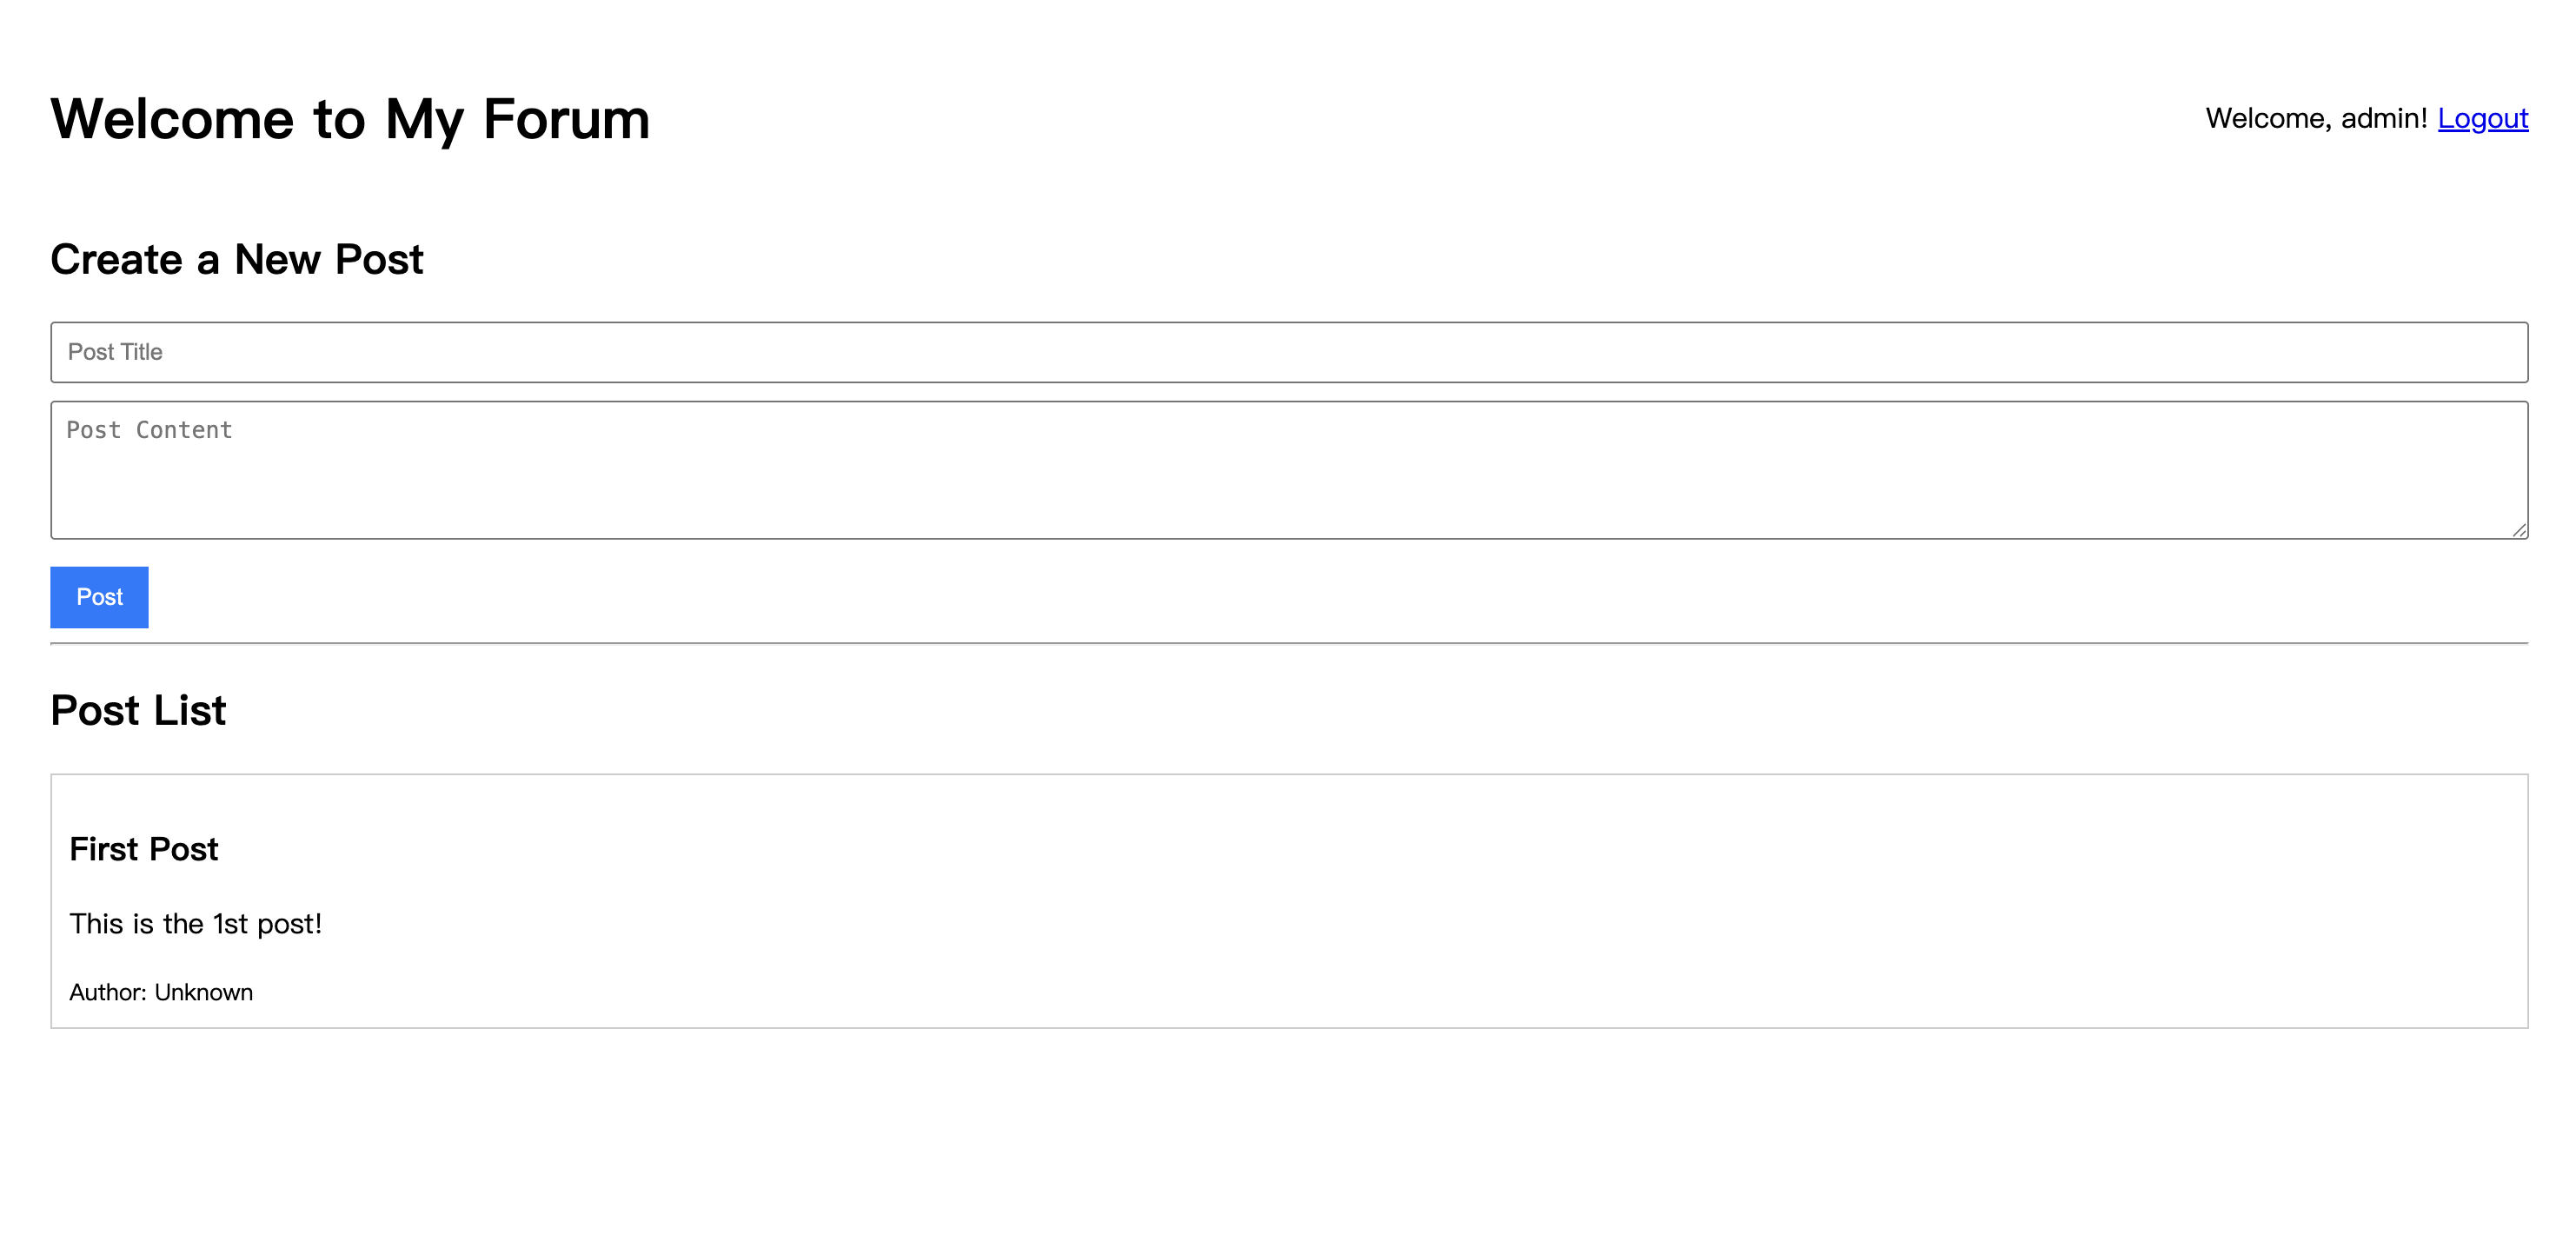
新しいユーザーを登録し、ログインしてみてください。ログイン後、投稿フォームが表示され、ページの上部にユーザー名が表示されます。
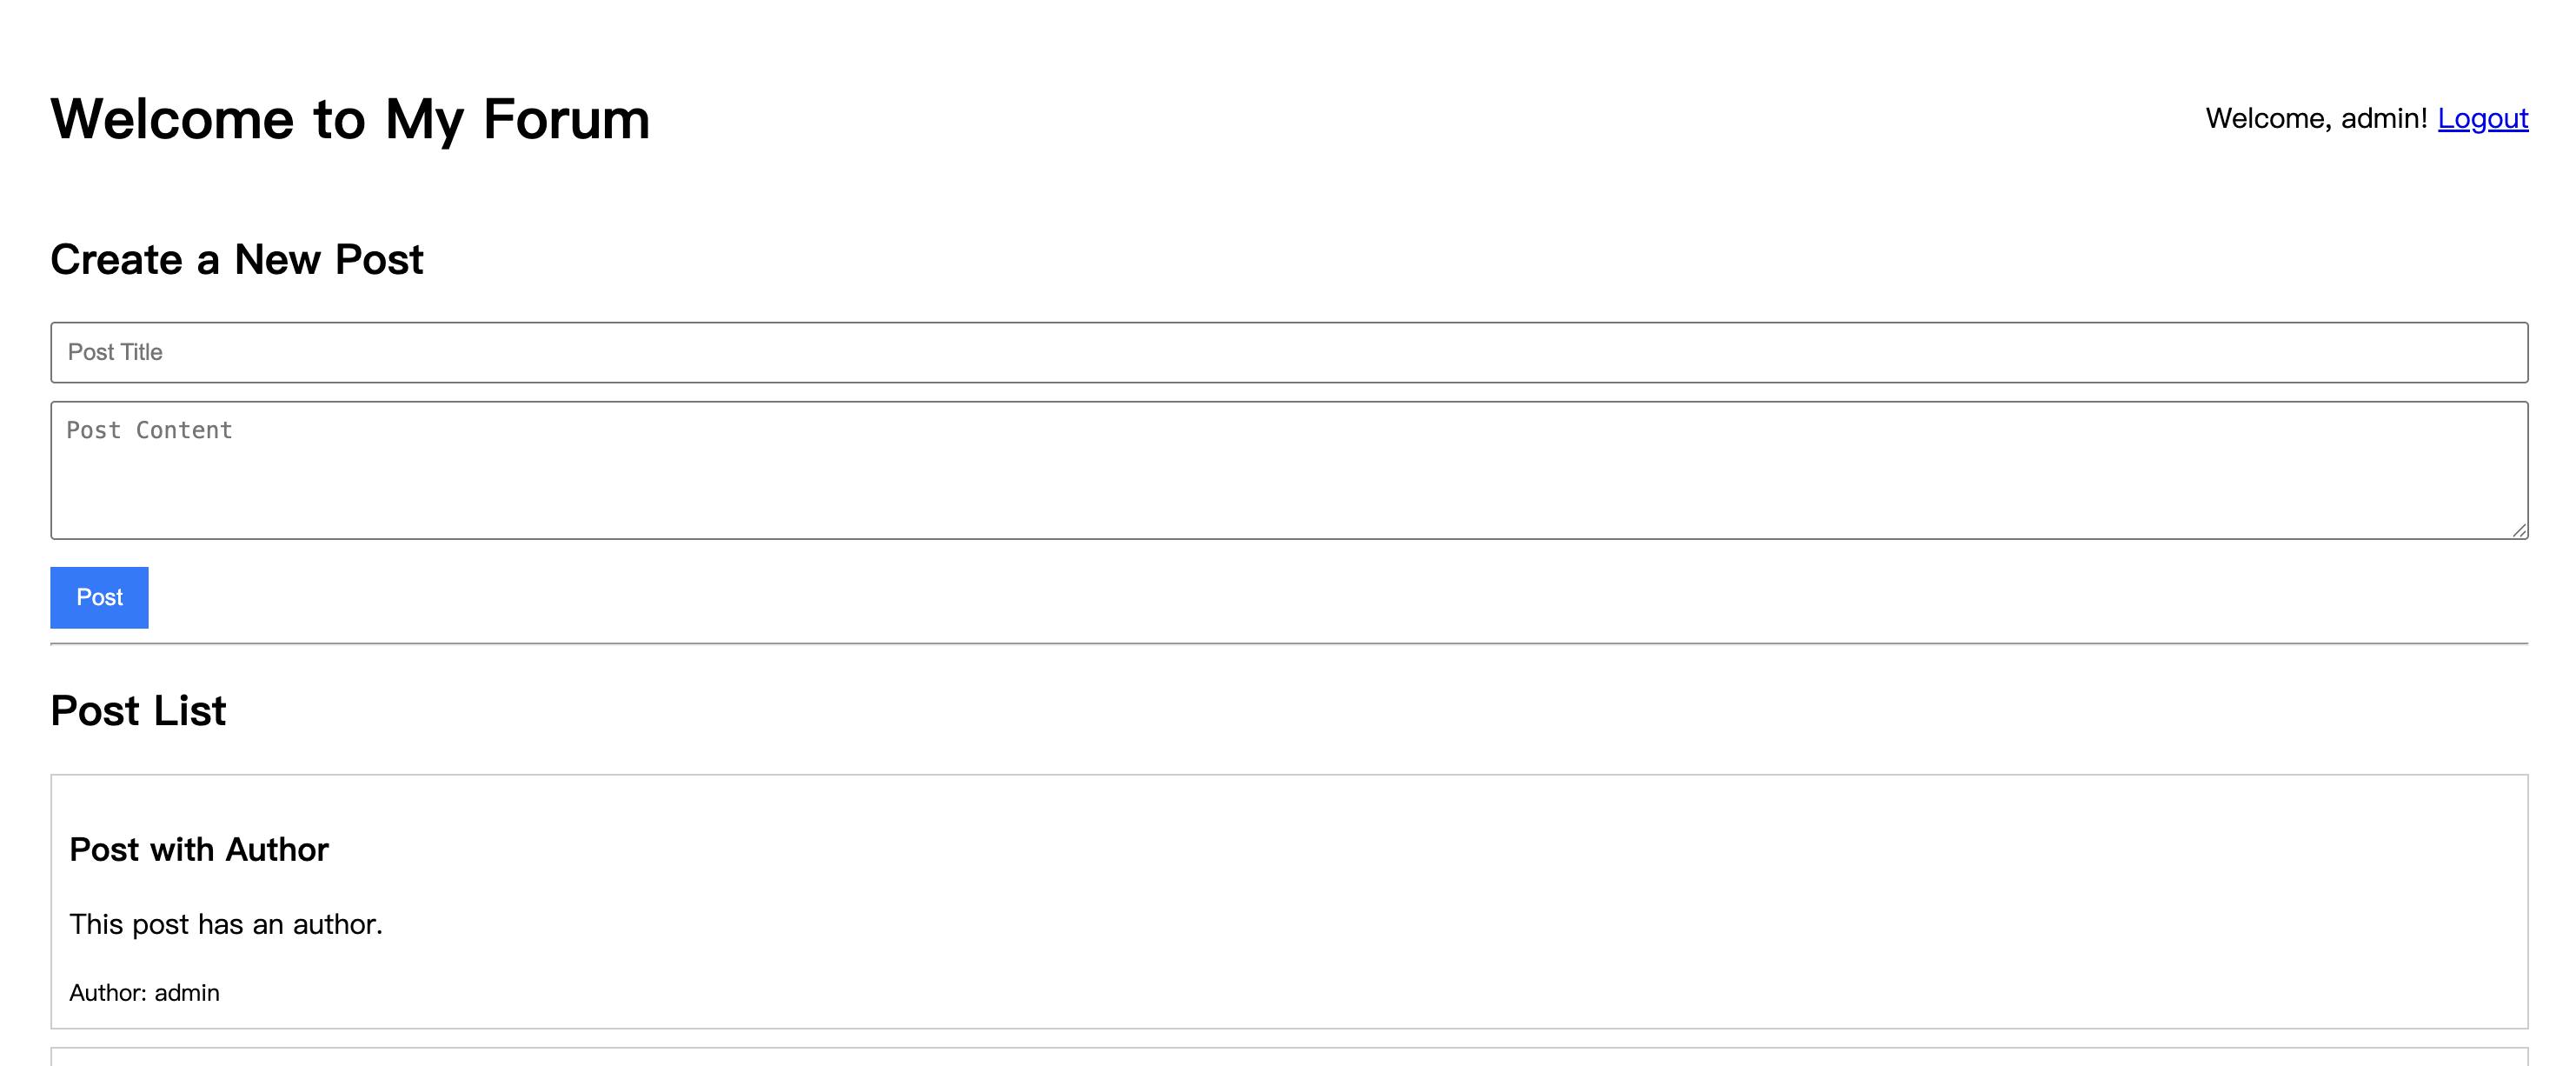
投稿を送信すると、その作成者は正しくあなたのユーザー名として表示されます。
まとめ
この記事を通じて、フォーラムのユーザーシステムを構築しました。これで、誰もが登録、ログイン、そして自分の投稿を公開できます。
投稿にユーザーが紐づいた後、次のことを検討できます。もしユーザーが自分で公開した投稿の内容を変更したい場合はどうなるでしょうか?
次の記事では、現在のユーザーシステムに基づいた新しい機能、つまりユーザーが既に作成した投稿を編集できるようにする機能を実装します。